Showing posts with label Paper Extras. Show all posts

Wednesday, March 6, 2013

Magnetic File Folder

 
So here is my first project with my "Say Cheese" kit...

Look twice at this...
It started as an accordion file folder.
and see the big lable... it is chalk board paper!
 
I put magnetic strips on the back,
 so it will stick to our refrigerator!

No more papers sliding all over when
the kids slam the fridge door!

Perfect for school calenders
and unfinished homework!
 
and if you think this is pretty cute...
heard on over to see what the other Front Porch Girls made
and while you're there order your kit!


Monday, June 4, 2012

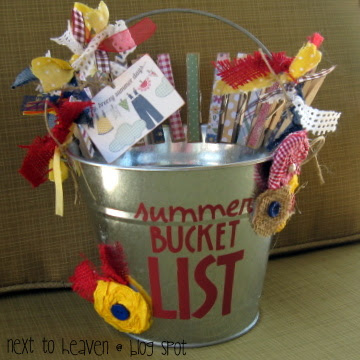
Summer Bucket List

I hosted a craft night for my mom's group...
we made these cute buckets to keep track of all
the fun summer things we want to do with our families!

I have more details about the project on my family blog HERE!

Thursday, January 12, 2012

Mini Altered Journals

 A few weeks ago, while strolling the aisles of Family Dollar,
I found a 3 pack of mini composition books $1.50!! 
The were so cute and screaming for a make-over!
These are perfect for your purse, car, or night stand.
 They are only 4 1/2 by 3 ish inches.
 And have 80 college ruled pages.
 
For this project I used...
The first step, is to trace both sides of the book on the back of your patterned paper.
I traced from the edge to the black spine,
as I knew I wanted to use a different paper for that side.
Remember to consider the placement if your print has an upside and a down side!
Now you can Mod Podge the cover on.
Be sure to coat the edges really well,
as it will be manipulated a lot when you use it.
If your paper comes off  the sides- no worries- just trim it down.
Next, I cut about a 1/2 inch strip of coordinating paper for the spine side.
This is a great chance to use a border punch if you have one!
After, the front is nice and dry, flip it over and do it again on the back.
Let it dry as well, and then it is time to embellish the front!
If you are planning on layering any more flat pieces,
go ahead and Modge Podge them on.
I used a scallop punch. 
 Any fun die cuts of flat stickers will work, too.
Last you will want add your fibers and 3d embellishments.
For this book I used
  • bakers twine from Jillie Bean Soup,
  • vintage buttons,
  • and a scrap of ribbon

I also tied fiber scraps onto the colored paper clips
 to serve as cute book marks!


Here are the bunch I made. 
Anything goes here, girls... 
 tickets, chipboard, flowers, fabric, ribbon, and ephemera!

I will have some in my Etsy shop HERE!

Tuesday, November 8, 2011

Sccrappy Fall Canvas

It is about time I pulled out my scrapbook paper!

I made this adorable canvas... so much fun!

Thursday, September 22, 2011

An Altered Rolodex... for less than $10

I made this cute little Rolodex to help store all our numbers and business cards. The Rolodex was maybe $6 at Office Max and the paper and embellies were some I already had, but it did not take much. For more details check it out HERE!

Wednesday, May 11, 2011

Scrappy Journal

My bestie and I are starting the on line book and bible study over at Good Morning Girls.... knowing how much she HATES mornings I thought a pretty journal would help... well, this two cups of coffee! I have always loved this paper and kinda hoarded it for just the right thing... so happy I did. I Modge- Podged everything and hot glued the flower!


I made this flower out of some thin felt (more about this embelly HERE) and of course had to add a doily! The blue is the back side of the paper- should have looked who made it, huh?


I know this blury photo may hurt your eyes, but I did stamp g.m.g. (good Morning Girls) right onto the doily- you can also run these through a printer... maybe I can do a tutorial on that soon!


Here is the inside...

On the inside cover I made a little frame background and added a place for sticky notes. She will of course use a pic of her family, but I laid mine on for this pic.


The first page has the schedule and a clip that I added ribbon, too.
Now, I need to add a few inspirational stamps to random pages for fun!


I will make on for myself this weekend and maybe even make another on for my weight loss journal or new house ideas. Adelyn wants one, too... she already started "writing" in mine!


Thursday, May 5, 2011

Super, Easy Paper Flower

I have made many, many paper flowers lately...

but this is my go to flower.

I do not have to use a die-cut, my Cricut,

a dowel to shape the flowers, trace anything,

or even double sided paper-

this is my kinda flower, girls!

Pretty cute, huh?

All you need are you favorite scissors,

scrap paper, a button, and some glue!

Here is my scrap and the place where I cut my original circle.

You can eye a circle or fold the scrap in half... like this.


Now think the letter "C" ... tall and round,

but not fat or you get an oval or egg shape.


Hmmm... not happy,

so i simply fold the other way and trim it off.


Perfect-ish!


Now, fold the circle in half

and then in half again.


And one more time...

do not worry about wrinkles or folds...

that is all a part of the technique!

Here is my little trick...

I use the shape of my thumb as a guide to round the top.

In the picture you can see I have trimmed

only one side and will do the next.

Make sure you trim down the side,

because this makes your pedals deeper...

make sense? sorta?


Here she is all opened up and crinkled.

Smush her into a tight wad....

open her up and repeat!


I repeat the process two more time with two different papers.

Each time my "C" gets a tad smaller and

for the last flower I use my pinkie,

instead of my thumb as my pedal guide.


Stack 'em up with a dop if glue in the middle of each flower.

I used Zip Dry today only because

my glue gun was not plugged in,

but I like the gun because it is cheaper and faster!

(and I love cheaper and faster)


I almost always go for a button in the middle,

but brads, gems, glitter,

and even a paper circle will work, too.

Sometimes I ink the edges

or rub Speckles over it.

I plan on trying Diamond Glaze

for a more glassy look, too.


Now, go make a few pretty flowers

and then use them on a page about your mom!

(yup, that is an order!)

Saturday, March 12, 2011

No Time for Layouts

It is baby shower time!
Yay, for a new niece who will be here in May! Hope to post some of the great paper details soon!
and you know it will most definitely include a banner!


Wednesday, January 5, 2011

Faith Wall Hanging

Last year I joined Ali Edwards and lots of other bloggers in selecting a word to focus on for the new year. She calls it OLW (one little word). My word last year was FAMILY and I made a banner for our mantle to remind us what we were focused on. This year my word is FAITH and I made this wall hanging to help us think about building our FAITH everyday.
I am so in love with these colors. They just feel so light and fresh... like you should feel when you are walking in full FAITH! These papers are from Close To My Heart's Splendor collection.
The backing was an old cereal box that I traced this pretty shape onto. I had the shape from an old Technique Tuesday kit. If you don't have a shape you like, you can search on line for clip art and trace it that way. I traced the shape again and cut out the inside to make the frame. It is stacked up with a double layer of 3D foam... that makes it look almost like a shadow box.


Here is my birdie... lovely, huh? I kinda free handed her...again on a box for chip board. Her wings are used dryer sheets... ironed, cut, and layered! I also used them as ties on the hanger and bottom trim. I am sure there is a name for the fan folded circle I stuck her on- I am so addicted to these things! They are super easy and add loads of texture to layouts and cards!

Ta-da! I used the handy ole Crop-o-Dile for to punch the holes for the wire. And all the beads are from an old beaded wine bottle cover -ha. Now, I am thinking something similar for a house warming gift or Valentine decor!

Tuesday, October 26, 2010

No Time for Layouts

I have not had time to make any layouts lately... I have been too busy getting ready for Adelyn's big first birthday party. I love doing everything myself and make a point to have as many special details as possible! She had an owl birthday, which was super inspiring and fun! Here is her banner. It looks so much more than it really is. Trust me do not buy one of these... it takes two hours at the most!
I also did one for her high chair... you can kinda see it here.
I made the treat bags and put in some fall cookies. How cheap are these? Umm... I mean cute?

Instead of buying the fancy hat, I just embellished the cheap one with ribbon, stickles, and tulle.

I covered tin cans to hold the spoons, forks, and napkins. For more pictures for Addy's celebration check out my other blog HERE!

Sunday, May 30, 2010

Train Invites

My son just turned three and requested a train party. We held the party at a park that had a train you can ride- it was lots of fun. I tried to make everything I could myself... luckily it was just for family since it was out of town, so I only made ten invites and six party favors. Here are my invites... super happy with how they turned out. I traced the train cars by hand because I was not happy with the Circut train pieces for this project, but it did come in handy for the wheels. I ran the wording on the computer and the three was a punch.
This is how the look folded up for the envelope and then they just unfold when you open it.

I always like to display old pictures at birthday parties. It is fun for guests to see and for mommy to remember! I made these generic birthday (not train) so I can use them again! These were raw wood from Micheal's and cost me .99 cents!!


This little train was raw wood from Michael's... and again each piece was .99 cents! I painted it black and the covered it with bright paper and glued buttons on the wheels. Mike still plays with this... made me think it would be a great handmade birthday gift for his friends!


Every party needs treat bags. I had this old tin bucket and left over vinyl to trace the engine. The three is a sticker. I like the fact that the vinyl peels right off- so I can keep using the bucket.


I was so happy with how these turned out. I used the Circut to cut two of the spiky circles, a punch to make the white circles, and the train punch is from the Martha Stewart collection at Michael's. I also used these to top the toothpicks for the mini sandwiches- cute!